Customization, Mandolin Repair, Necks, Speed Necks
By Brian Beker
One score and seven years ago, I sold a Lloyd Loar F-5. Included in the deal was a brand-new Gibson A-5L. The A-5 was okay, but that was it, and not because I was spoiled by the Loar. As a new mandolin, it was just holding something back, and I expected it to open up. It took years, but eventually it developed a pleasing, though never exceptional tone. The worst thing about it was its thick neck, a sharp V-profile under heavy, high-gloss lacquer, which created lots of friction. Every time I played that mandolin, for a quarter of century, I regretted that neck.
A well-regarded luthier turned down my request to reshape the neck, saying that its integrity would suffer. I took his word for it and kept playing until that sharp V started to hurt my hand. The mandolin started spending a lot more time in the case.
This was heartbreaking. It was my only mandolin. It had traveled the world with me. It had been in all of the Lower 48, in Europe, all over south and southeast Asia, even on the back of a motorcycle for a 6000-mile motorcycle trek through India and up to nearly 19,000 feet to the Tibetan plateau. I was never much good as a player, but I loved playing and didn’t like to go anywhere without my mandolin.
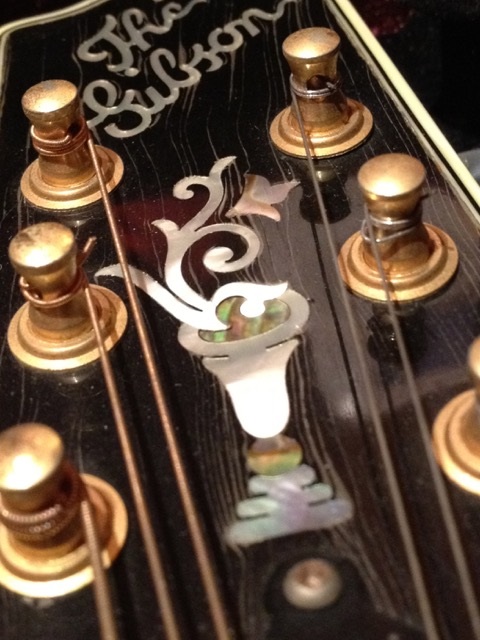
You know how you look inside your mandolin from time to time? I’m not sure what it is anyone might expect to see there, but it’s part of being a mando player and if you’re reading this, you probably know exactly what’s in your f-holes like I do. In mine, there are the Gibson factory labels, signed in 1990 by Steve Carlson.
A few months ago, out camping with my dog in east Oklahoma, I tried playing the thing. That sharp V dug in. It seemed like it was going to cripple my hand with permanent nerve damage. It occurred to me to track Steve down and ask him if there was room to safely trim the wood. Steve wrote back to say he took his old A5-L out to look it over, and sure, it could be done. He warned me, though, that it might look a little funny because of the way the flat of the back of the peghead tapers into the V of the neck.
Steve suggested asking Bruce Weber to do it. Had this not been an actual conversation, that’s when I would have said, “Bruce Weber? The Bruce Weber?”
I looked Bruce up online. Montana Luthiers did not yet have a web site, so he wasn’t where I emailed him.
I didn’t hear back. I wasn’t surprised. Yeah, right… Bruce Weber, whose name has faced countless audiences on the pegherds of countless prized mandolins in the hands of great players, was going to file a neck down for some guy whose only audience is a dog who looks like she wants to be returned to the shelter every time the mandolin comes out.
In the meantime, I was waffling anyway. What if I actually got the job done and didn’t like it? There wouldn’t be any going back. Maybe I ought to just leave it alone. Find another mandolin. Trade it in and done with it. No, couldn’t do that. It had been with me too long. It had weathered and aged, the finish was checked. If it wasn’t for that awful neck, it was beautiful. There just had to be a good mandolin wrapped up in that one.
But then (the poor dog and I were camping in West Virginia by then), the phone rang. It was Bruce. It had taken someone some time to forward my email to him., but as soon as he got it, he called.
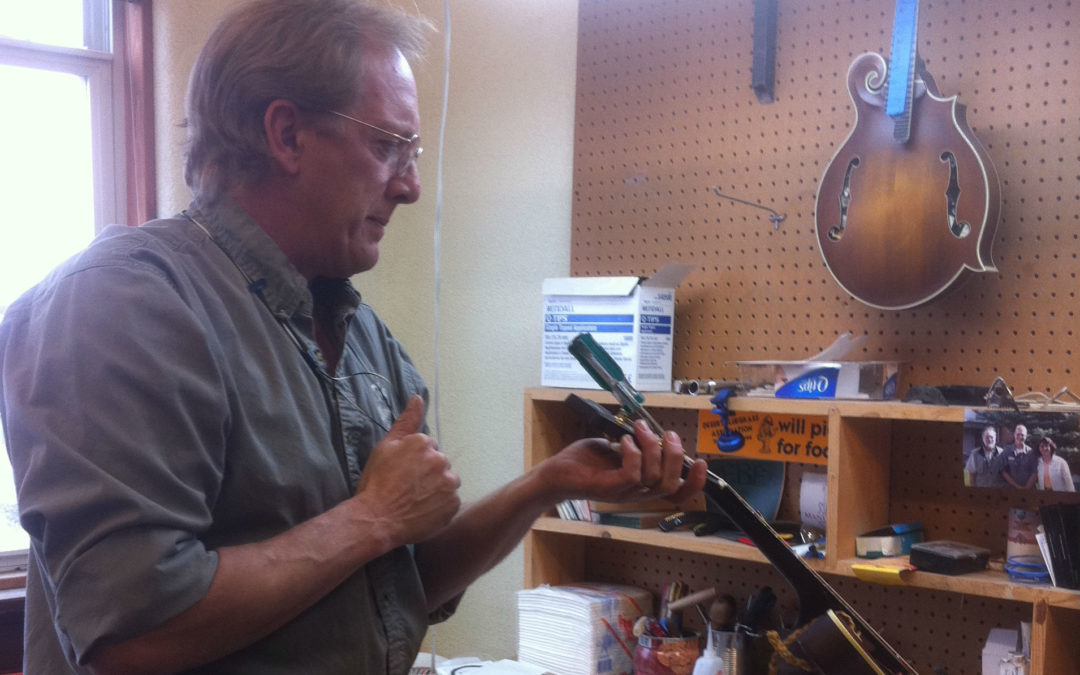
The amount of time Bruce spent on the phone with me must have set his building schedule back. He wanted to make sure I had every opportunity to try to convey what I hoped for. Just talking about getting rid of the painful V made me feel better. And the gloss lacquer? Begone! I expected the raw wood look of a speedneck to be on the annoying side, but that mando was already as uniquely worn as an old boot. So what if it got a little weirder.
He said he’d be happy to do it. I shipped the mandolin to him from a little country post office up in the panhandle on a Friday.
Bruce let me know when got the mando on the following Monday. By Tuesday he was texting me progress pictures. When the wood was trimmed, he sent another picture to ask if he should apply a touch of tint to bring out the figuring in the maple or leave it blonde. We went with a light tint. And then another photo when that was done. In the course of our talks, we had begun to discuss a favorite topic for both of us — dogs — and Bruce texted me a picture of his new puppy Ranger playing in my packing material.
It was looking good. When Bruce got it strung up, he determined that the original pearl nut was producing a slight buzz (I had been suspecting one and could never figure it out) and asked if he should change it. My choice: bone or pearl. He said bone wouldn’t last as long but would warm the tone up a bit more. I went with bone.
On the Friday of that same week, the mando arrived (in Maine, then) via Priority Mail. That’s worth repeating: Bruce got it on Monday in Montana and I had it back, by Friday of the same week, without expressing it.
I was surprised at how anxious I was when I unpacked it. I mean, I might have asked for something that I might not have liked. I would know the second I put my hand around the neck.
And it did, in fact, take only a second. It was the neck I had hoped for. The only mandolin I had ever played that it resembled was the one on my old Loar. Even with the strings still detensioned for shipping, I knew this was perfect. And though some folks might not find the way the black finish at the heel and top of the neck on any speednecked mandolin might look, it’s beauty surprised me. Much more so than the bulletproof lacquer there was before (by the way, the nitro on the body isn’t like that at all – it’s finished beautifully). The tiger-striped grain in the maple shifts in the light. Why such a beautiful piece of wood was ever covered up is a mystery.
Steve Carlson’s warning about the neck looking odd where the flat of the back of the peghead meets the neck, was handled perfectly by Bruce. He sculpted it beautifully to preserve the V at the bottom of the peghead. There is no indication of any line being off at all. It is artistry. The feel of the quality of the instrument was changed entirely.
On the change in playability from speednecking: the before and after is mindblowing. All friction is eliminated. Position shifts that I used to believe were beyond me are coming easily. The difference in no hand drag is huge. It is as great an improvement as the flatter neck profile is.

In case you’re wondering just how big a bribe it took to get someone of Bruce Weber’s caliber to do the neck, replace the nut, dress the frets, take the action down as far as it would go (what a great setup this mandolin has now!) and swap out the tuners for some play-at-home hobby player — and do it in two days… well, I’d rather not say. I’d hate to alert him to what might well have been a serious accounting error in my favor. I doubt that, though. I think Bruce and Mary just don’t suffer from the affliction of greed.
All in all, nothing about this whole escapade was less than ideal. Master luthier perfectly enhances mandolin to where I now love it. It sounds, feels, and even looks, better than it ever did. I don’t know if a bone nut can account for that much of a difference or if the removal of some wood or the finish does, but it is ten times the mandolin it ever was. I’m so glad I held off until fate and Steve Carlson steered me to Bruce. Bruce justified all my hopes in the mandolin, all the time and distance it’s traveled.
So, that’s my once-in-a-lifetime re-profiling and speednecking story. I used to turn that mandolin over and frown at that neck. Now I find myself gazing at it with a smile. It could not be improved.
To be completely honest, though, I should disclose that I did have one issue with the job, which I sent to Bruce immediately as a text that read MAJOR COMPLAINT: (I paused for a few seconds) and then reported that I was still not able to play like Bill Monroe.
Bruce texted back that he had forgotten to put the BM mojo in the box.
Well, at least he didn’t skimp on any of the BW mojo.
Brian Beker Author of ‘Notes From a Dog Rescue in Progress’, and upcoming book, ‘The Dog in the Clouds’. Check out his blog which is a memoir-in-progress about a dog sent for too short a time into a life on the run. http://thedogintheclouds.com
Common Mandolin Repairs
Mandolin Repair
“Peel away the hopeful interpretations, and the ‘vintage’ stands revealed as simply ‘old’…
The gap between my private logbook and the service ticket is the space where the ethics of
repairing motorcycles gets worked out.”
Shop Class as Soulcraft: An Inquiry Into the Value of Work
The topic of repair charges (though most may say the topic is ‘why does it cost so much?’) can provide an interesting discussion. I’ve been quoting from Shop Class as Soulcraft as we have really enjoyed this book on many levels, at this time in our lives. Bruce especially liked Chapter 5 which is entitled ‘The Further Education of a Gear Head’ because the author talks, among other things, about what goes into his billing for repair work.
First, anyone with a lawn mower or weedeater understands repair. You have to work on these small machines all of the time. Even if you take it in for repair at some point you ask yourself does this need, or deserve, fixing again? When is the cost too high? We had a mild mannered friend who made this decision by one day simply pouring gas on his lawn mower and torching it after bashing it with an ax a few times (he’s a banjo player in real life come to think of it : )
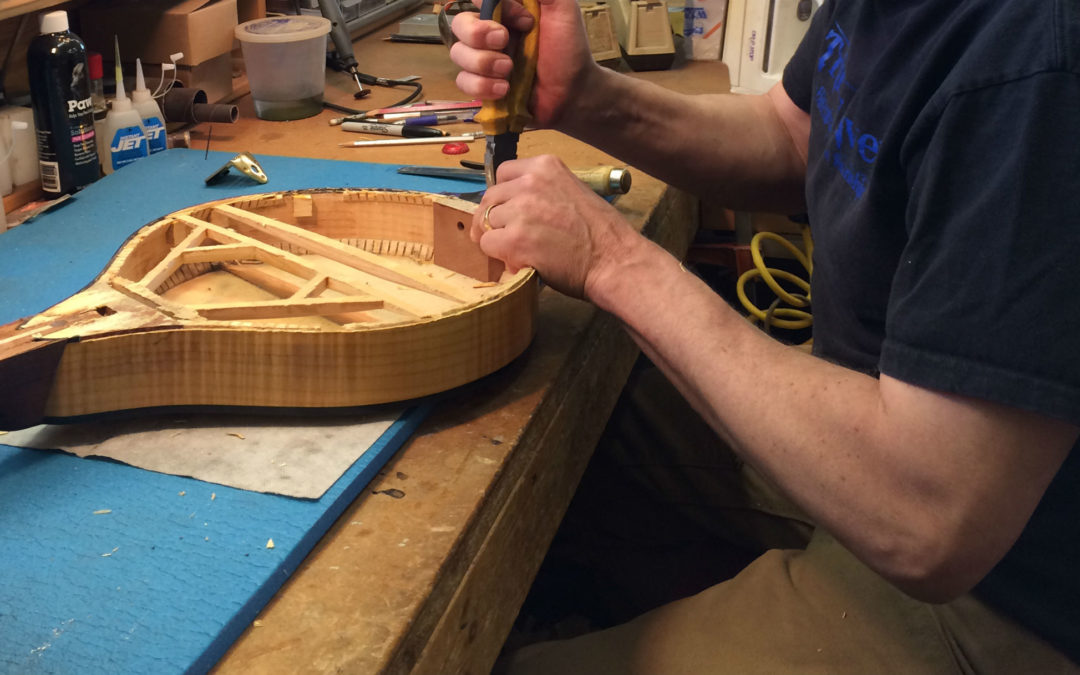
Mandolins aren’t lawn mowers, however, and one difference is if the cost is too high to make a vintage instrument playable again it will look beautiful hanging on your wall. Not because they were not fine instruments to begin with, but because so many of them need a lot of work to complete the owner’s request of, ‘just make it playable again’. This simple request begets new work as pieces and parts crumble while working on something else and then there’s a need to make a custom replacement part, on and on. Many of the neck joints in these older instruments are not pretty and take quite a bit of finagling too. These repairs are hard to estimate as one thing can lead to another. Even though the instrument may have significant personal value, most people can’t justify (or balk at) the cost. There are exceptions.

Bruce does like to fix old things, however: 1958 International, 1921 shop/school
Example: He recently worked on an early Flatiron F that the points had deteriorated on. While replacing the points, areas of binding started to crumble leading to a binding repair which led to finish touchup, and oh yeah, he just noticed a loose brace. The player would really like those stains in the finish on the peghead removed from years of a tuner being clamped to it? Strip and Tung oil that, reset the bushing and cleanup the tuners so you can turn them without a pliers. A re-fret led to replacing some of the fret markers and since we’ve gone that far might as well replace the nut and upgrade the bridge. Sand and buff, add a K&K, string it up, set it up to play like butter and it’s ready to rock again. It was a beautiful Instrument that was well worth the time put into it, but how do you charge for the actual time spent on all the little details that go into all those processes? Bruce usually doesn’t. Especially for players who are friendly and have a true concern for their babies (eight string that is). Building is a true art and repair, if it’s done correctly, takes it to a whole different level.
Bruce has been underbid almost weekly by back room repair shops. I asked if this irritated him and his response was no. Some of these will find their way here eventually to have the work redone correctly. He’s not saying there are not great repair luthiers out there, just that ‘least expensive’ is not always the best choice. Remember, it’s not a lawn mower.
Of course, if a newer instrument has been severely mistreated or damaged the cost may outweigh the benefit also, but when you think it through, you see the market (thus pricing) is legitimate if a finely made, newer instrument still costs more than the repair cost to fix most problems and also helps to maintain the value of the investment- more like a car than a lawn mower.
Simple repairs may be performed on, how-to-say-it-nicely, cheapy mandolins but a good repair person may refuse to do major repairs (put a new top on it or ‘make it sound better’) even if the customer is willing to pay. It won’t work even if the customer goes away happy.
This leads to the issue of the responsibility to the mandolin itself. Bruce gets many instruments where the request is to tune it up, check things out, and spruce it up a bit. Sounds straight forward but like doing a painting, when do you know it’s done or time to stop? It’s similar for more straight forward work such as a fret job. Even though he’s had many years of experience in creating and building, thus judging this invisible point, it’s hard to stop sometimes. There is simply usually something that will improve the mandolin even though it wasn’t requested, it just needs to be done, mixed in with a little obsessiveness. Then there is the wild request that turns out taking forever to find/get the material, then make whatever, then figure out how to actually put it on/in the instrument and you can’t charge for 20 hours, besides it was fun! All this to say there is a lot of time put into repair usually that isn’t charged out, but needs to be done.
Hopefully this explains an estimate you might get and improves communication so that you, the player, are happy with the outcome. Give Bruce a call or email if you would like to talk over a repair or customization.
Humidity Damage, Mandolin Repair
‘The marketers seem to grasp that it is not the product but the practice that is really attractive.’
Shop Class as Soulcraft: An inquiry into the Value of Work.
One of the most damaging repairs Bruce gets in (unfortunately fairly often) is due to over humidification. Remember how he sniffs each instrument? One time an instrument had so much mold (from Hawaii including a fair amount of rust and gecko droppings) that we thought he might have been poisoned after breathing it in.
Many of you will think this information is elementary but, as mentioned, we see this type of damage all of the time and much of it is preventable. Here is the real scenario: You save up, sell a guitar, and buy a new mandolin! Of course you talk about it at your local music store, go online and want to treat it right. In three months the finish is starting to look a little cloudy and it’s difficult to play so you send it back. Bruce opens the case and eau du musty trunk permeates the room, he grabs up three honking humidifiers from the case, one of which is snaked down into the soundhole, throws them in the garbage muttering the whole time… You are upset that it is not as issue covered under warranty! and then have to wait several more months while the instrument shrinks to its intended size (dryer fabric sheets are put in the case but some cases find their way directly to the trash). Unhappiness all around.

In a nutshell, you worry about your instrument drying out and cracking, glue breaking loose, finish damage, etc., however the wood that goes into your mandolin is very dry (10-12% when made into instrument parts) and builders try to keep their shops around the 30-50% humidity range. It takes quite a bit for an instrument to get too dry. Excessive heat is the real killer! The Mandolin family of instruments can tolerate changes in temp and humidity much better than its flat-topped cousin but don’t hang your instrument too close to the wood stove or furnace vent, or leave it in a hot car all day, and then wonder why the lacquer has checked and seams are started to separate.
If your mandolin is over humidified it will take weeks, and even months, to dry out and is hard to play as you chase action and intonation around while it’s drying. If you decide to ignore it during this period, here comes the premature plane and re-fret to flatten the now dry and bowed fingerboard. If extremely wet the seams and braces let go and the finish peels, especially if heat is added. This causes a big repair of regluing, and in Bruce’s opinion, the glue joints are never as good as the original. Worn finish happens on any instrument, but peeling finish is ugly and refinishing an entire instrument is costly.
Why is over humidification happening and what are the solutions? First, it is never recommended to put anything holding water inside the instrument body- it’s all raw wood in there and the sound chamber is just not that big. Many players use In-the-case humidifiers that are intended for guitars and thus way too much for the mando, also gauges are used that aren’t accurate or quit working. Bruce recommends running your hand over the back of your instrument and if you can feel a pronounced curl of the maple, it’s too damp. If the action has suddenly become uncomfortable, the top is swelling. Remove all humidifiers, keep it in the case, (unless it’s already smelling like the old trunk) and continually check the neck and make adjustments to keep the fingerboard flat.
The carved instrument family acclimates to its environment and has an adjustable bridge and truss rod to take care of the little tweaks necessary to action and intonation. It goes from the shop or store to your house and will acclimatize to its everyday environment. Here’s the controversial part- eh hem- humidification is very rarely needed. Remember where it came from and many areas are much more humid. Most of our houses are pretty climate controlled all year round. If you always play inside and keep it hanging on the wall where it’s handy you may hear it pop once in a while with no accompanying problems. If you take it from air conditioning to an outside summer jam, or fly from Florida to Montana, let it acclimatize just a bit (adjust it as needed) and jam. Continuous fussing won’t change anything and can lead to the dreaded over humidification.
Your instrument should be able to go where you play, not dictate it. If well made, mandolins are tough little buggers. If you are an active player, running into extremes is inevitable, but with a little common sense and attention to what your instrument is telling you (playablity, intonation) and with a little TLC it will serve you well wherever you play.
Mandolin Repair, Necks, TroubleShooting, Truss Rod
Preventable Repair #2
The neck on your instrument is bowed because the truss rod has been neglected.
There is a lot of fear involved in adjusting your instrument’s truss rod on your own, even by those who think nothing of sky diving or playing their mando in front of a huge crowd. When adjusting the rod the neck often makes snap, crackle and popping noises- and then you start to sweat while thinking, ‘what have I done!?’ Some of this fear is generated by a few horror stories that make the rounds. Mary may have contributed by posting this picture, on MandolinCafe, relating that the rod was sticking out of the back of the neck.
 Yes, cringe worthy and anxiety producing however most adjustments are done with no problems at all. I posted it again because it’s very dramatic but mostly to show how important it is to keep an eye on the neck of your mandolin and keep up with needed adjustments. I believe that anyone and everyone should pay attention, at least monthly, to “neck health” and learn how to adjust the truss rod of their instrument. The picture above is an example of a truss rod that most probably was NEVER adjusted before, then an attempt was made to force straighten the neck– trying to solve a problem created over years in a single hair rising session. Over an extended period of time, if not corrected, the neck will settle into a position where the truss rod is no longer able to straighten, requiring some TLC from a luthier.
Why adjust the truss rod: Environmental factors such as heat and humidity will expand and contract your instrument’s tone woods including the neck, affecting string height (action) and neck station. The strings exert pressure on the neck (and the top) pulling the peghead up towards the tailpiece. This string pressure is also the reason you should loosen the strings if your mando is going into long-term storage (be sure to dig it out of the closet or from under the bed to check the flatness of the neck periodically), or being shipped (with the possibility of taking a hit).
If your truss rod is not adjusted when needed (to keep the neck flat) eventually it will, at minimum, need a plane and re-fret and as worst case a new neck (as the picture above demonstrates). In reality, the truss rod is your friend. It was a great invention that will keep your neck playable.
When to adjust the truss rod: Monthly, changing seasons, travel, storage, uncomfortable or hard to play, noticeable bow in neck. See trouble shooting below.However, after reading this please free to contact The Bruce if you need additional information or a pep talk.

Be brave of heart, paint your face blue and charge through the directions below.
The correct order in basic setup: Truss rod, Action, Intonation.
TRUSS ROD ADJUSTMENT
The neck should be near flat as you sight down or lay the edge of ruler down the length of the fretboard on both the treble and bass edges. Under full string tension, just adjust the rod 1/4 turn at a time, checking the neck as you go. The neck may groan and pop a little. If the neck is slightly twisted, use the first edge to reach true as a good place to stop.
1. To take relief (bow) out of your neck, tighten the truss rod. (turn CLOCKWISE)
2. To relieve hump in the neck, (rare, unless you’ve over tightened the rod) loosen the truss rod. (turn COUNTER CLOCK-WISE)
- If the rod will not move or spins freely and you still have a bow, it would be best to visit a local luthier or send it to Bruce.
CHECK ACTION: More often than not you’ll have to adjust the action (playability) after a successful adjustment session (the fingerboard is flat). Tightening the truss rod, bringing the neck back to true, will lower the action. A good medium action on your mandolin is 1/16” from the top of the 12th fret to the bottom of the G string and a hair less on the E side. Most mandolins will have some way to adjust your action at the bridge. If you’ve over tightened the rod, the instrument will buzz on the first five frets at a good action.
CHECK INTONATON: If you’ve done either a major truss rod or action adjustment, the intonation my need to be tweaked. If the instrument plays sharp at the 12th fret, loosen all but the outside G and E strings and gently move the bridge towards the tailpiece checking the intonation on the outside strings as you go. Small movements of the bridge will serve you well in this process. If it plays flat, move the bridge towards the peghead. When you are satisfied with the intonation you can bring the remaining strings up to pitch while insuring the saddle hasn’t started leaning towards the peghead as you go (we’ve had many sent in that turned out to be just the saddle leaning, robbing the instrument of tone and volume).
Note: If you play with a high action, your bridge placement will be slightly closer to the fingerboard.
BASIC TROUBLE SHOOTING
If you’ve made sure that the fingerboard is flat and the action correct but are still having issues perhaps the information below will help you figure out the problem.
1. Buzzing
-While played open: action is too low, nut slots are too deep, or cut at the wrong angle. The nut should be replaced.
-while fretting at a single fret: the next fret is too high.
-buzzes on frets 1-5: truss rod needs to be loosened and adjust action.
-buzzes on frets 6+: truss rod needs to be tightened and adjust action.
- One or more strings sound fuzzy or won’t note clearly as played up the neck: slots in the saddle need to be recut at the correct angle.
3. String goes sharp while playing:
-String is sticking in nut slot: first try graphite (pencil lead) in slots- slot may have to be widened or the nut replaced.
4. String goes flat
-String is sticking in bridge saddle slot: first try graphite (pencil lead) in slot- slot may have to be widened or the saddle replaced.
-Machine heads may be worn and slipping.
5. Instrument will not intonate
(If you’ve recently changed your strings make sure your saddle is not flipped, bass for treble, and that the bridge is not sitting at a steep angle across the top of the instrument.
If intonation at the 12th fret:
-Plays flat : move the bridge towards the peghead
-Plays sharp: move the bridge towards the tailpiece
I hope this helpful! Once again, don’t hesitate to contact (LINK) me with any questions or concerns you may have.

